Find your Location
Ideally a garden spot should have full sun with good drainage (no standing water). It shouldn’t be too close to a road (that may be salted in winter or just have a lot of car exhaust). It should be relatively flat and not too far away from a water source if your region will require you to water regularly.
Plan your Dimensions
Using a measuring tape, plot out the edges of your garden. Use wooden stakes to mark the corners. You can tie string from stake to stake to note the edges (and move it as needed while working). Garden shapes can vary depending upon the space you have. Though gardens can be any shape, we recommend for your first vegetable garden to stick with a simple square or rectangle. Also, keep it small to start. It is better to be amazed at a bountiful small garden, then worn out and overwhelmed by a huge garden. If this is to be a class garden, consider that a rectangle will let many students work on the weeding at once.
Math Application: Use this opportunity to demonstrate what makes a square and/or rectangle.
Plot your Garden on a Garden Map
On a piece of lined loose leaf or graph paper, draw the approximate shape of your garden plot. If it’s a big garden you may have to tape several sheets together. Use each line (or box) on the paper to represent a measurement of your plot. For instance, each line can be 12 inches your garden. So that two lines are 2 feet of garden space. Or for a smaller garden, each line can represent 6 inches of garden space.
Draw in the dimensions of your garden. Depending upon what you plant, you will need 18-24 inches for each rows. – that’s three to four lines on your paper as the space between plants. See Space your plants.
Math Application: Use this opportunity to work on dimensions, measurements and proportions.
Choose your Plants
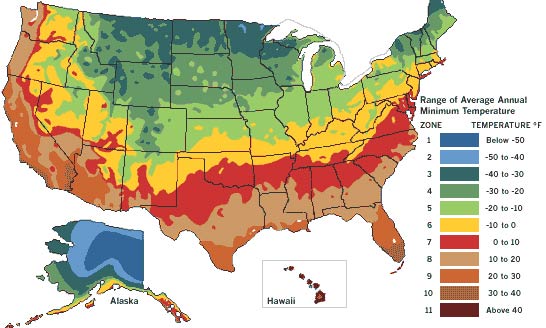
Choose the plants that you love to eat and that will grow in your region. (See USDA Zone Chart to discover your growing region). Some plants need too long to grow for northern regions, which only have so many frost free days. There are quicker varieties for northern climates, so be sure and check that when ordering seeds. Choose a variety or vegetables to let students experience every part of the plant. For instance: Spinach is a leaf, broccoli is the stem and flower, carrots are the root, peas are the seeds and fruit, etc.
Some plants are easy to grow from seeds planted right into the garden. Other plants do better if started inside (in a greenhouse or under a grow light) and planted as seedlings. If you have a budget for seedlings, it would be well worth purchasing them from a local greenhouse. They have the experience to grow them and “harden” them off, so they will not shock when planted outside. Depending upon the size of your garden, you will not have to buy very many seedlings. See the Seeds or Seedlings chart.
Caution: We recommend NOT purchasing seedlings from big box stores at malls as these seedling are often brought in from further afield nationally and this may be how tomato blight has been spread to home gardens.
Plants that can be planted directly in the garden as seeds: carrots, corn, cucumbers, kale, lettuce, onion sets, peas, potatoes (seed potatoes), spinach, all beans, zucchini, etc.
Plants we recommend that you buy as seedlings: basil, tomatoes, sweet and hot peppers, parsley, broccelli, brussel sprouts, cabbage, etc.
Once you know what you want to plant, check the Seeds and Seedlings section to know if you should order seeds or wait and purchase seedling.
Space your Plants
A vegetable garden can have a variety of delicious things to eat, but each plant will need a different amount of space depending upon how each they grow. Here are some examples.
• Sweet peas grow on a vine so will need some kind of fencing to cling to as they grow. This makes peas well adapted for rows where a small wire fence can be set up to act as a frame for your grow pea plants.
• Cucumber, zucchini, pumpkin and other squash plants are sprawling vines, so can grow up as well, but can also be planted on rounded mounds with a lot of room to spread. Each vine can grow many, so only a very few (or one in a small garden) are necessary. You can grow spinach early in the season close to wear your squash will later spread out and the spinach will be one before the squash need the space.
• Potato plants grow large and bushy and need more space because you will have to “hill them up” to keep the potatoes from popping through the soil and being damaged by the sun. Potatoes require extra soil as they grow.
• String beans can grow in a single row, but get bushy, so more room between the rows than carrots or beets.
• Sweet peppers, broccoli and cabbage grow up and out but given enough space can be well in rows or little squares.
For some idea about the space you will need for each plant and how much time your plants will need to bear fruit see the Spacing Chart and the Timing Chart.
Think About Future Pest Control
If you are going for a completely organic garden (recommended with kids), some plants may need regular hand picked pest control. For instance, broccoli and cabbage may require daily removal of cabbage looper caterpillars (which can be squashed or dropped into a bucket os soapy water). The same hand picking (and soap bath) works for Japanese beetles that have begun to invade regions throughout the U.S. and attack plants like basil, green beans, and sweet peppers. There are organic pest sprays (soapy water, etc.) and mild pesticides that you can also use, but you will have to decide how far you want to go with that and may need permission from parents to have kids around those at the time of application.
Prepare the Ground
If you are breaking up sod (lawn or field grass) it will take much more work than planting in a bare soil area, but the steps are simple.
1) Using a shovel, push down through the sod as far as you can go. Then step on the back of the shovel (boots recommended) using your weight to sink the shovel as deeply as you can.
2) Step off the shovel and wiggle it back and forth to loosen the sod.
3) Repeat this in small, six to ten inch squares, making sure the edges meet so your entire square of sod is loose.
3) Using your fingers (garden gloves recommended), pull out the square of grass. Shake out the excess soil back into the hole (including earthworms). This may take a little work as the soil will cling to the grass’s roots. It gets a little easier after the sod has dried out, so you can stack each square to the side and do another good shake back into the garden after a couple of days of drying. *You can also use the sod squares to fill in bare spots in your yard as it will root elsewhere if you lie it roots down on the dirt. Grass wants to grow!
4) Once you strip all the sod from your garden plot, you can move onto soil preparation.
Prepare the Soil
About Soil: Soil is made up of a lot more than just dirt. Soil is made up of sand, silt, clay, minerals, water, air, decaying plant and animal matter, bacteria, fungi, worms, insects, and the plants that are rooted in it. Each of these things is important for healthy soil. The soil on the surface is called “topsoil”. This is where plants will root and grow. Plant roots, in turn, keep the soil from washing away in the rain and blowing away in the wind. There is so much life in the soil that it has a food web all its own. Dig up a scoop of soil, break it up on a piece of newspaper and look at what it’s made up of. You may be surprised…
Historic Note: The dustbowl of the 1930s resulted from the plowing up of the prairie, followed by a long drought that turned the soil to dust. With no plant roots to stabilize it, the dry soil was blown into the air by the wind and carried into massive dust storms that covered entire states.
Science: Study the soil food web.
Fertilizer and compost: The first time you plant a garden on a particular plot, you can probably get by with minimal fertilization. If it’s been gardened before though, it may require a little shot of extra nutrients. We recommend horse manure if you have access to it. You can purchase animal manure in bags from a garden store or get it from a local farmer. Note that local farm manure will have weed seeds in it and require a bit more weed control down the line, but it’s so worth it for that powerful influx of nitrogen for your plants. Spread the manure thinly over your soil, then turn it into the soil with a shovel or rototiller. If you have been collecting compost (vegetable matter) in a compositor all winter, there may be some dark, rich compost ready to add to the soil of your garden as well as (or instead of) manure.
Turning over the soil: This can be done quickly with a rototiller, but a shovel is fine if that is all you have. It will just take a bit more time (and sweat). Once you turn the soil try to tread on it as little as possible. Plants grow better in loose, aerated soil. You can mark your rows with wooden stakes at the ends and string to guide your seed line and then make sure you only tread in the space between rows for the rest of the season.
Deep Bed Method: One way to mark out your beds and keep the soil loose and your feet on the path is to turn the soil with a walking path between every two rows (just wide enough to reach across). This removes the topsoil from the walking path onto the “beds” and raised it slightly above ground level. This acts to protects the crop in heavy rain from flooding and keeps moisture in the deeper soil in dry weather. For more formal raised beds, people will use board borders to trap the soil higher. This looks great and keeps little feet out of the beds, but adds expense to the project and the boards will have to be replaced every 2-3 years as they decompose. We find that you can just shovel a deep bed shape and with care it will remain in place and stay above trotting feet.
Mulch: We recommend mulch! You can buy mulch in bags or use bales of old hay or straw. You can even rake leaves into a pile in the fall and use them the following spring as mulch. The idea is that once your seedlings are up, you can surround then with mulch to keep the weeds down and the soil from drying out. A thick later of hay or other mulch on the path will also keep grass and weeds from growing in there over the summer. This will greatly decrease the need for weeding your garden. We don’t recommend bark or stone on the walkways unless you are sure they will be permanent and even then, they can get mixed up in the rototiller next summer and cause problems.
Seeds and Seedlings
Some plants are easy to grow from seeds planted right into the garden. Other plants do better if started inside (in a greenhouse or under a grow light) and planted as seedlings. If you have a budget for seedlings, it would be well worth purchasing them from a local greenhouse. They have the experience to grow them and “harden” them off, so they will not shock when planted outside. Depending upon the size of your garden, you will not have to buy very many seedlings. See the Seeds or Seedlings chart.
Caution: We recommend NOT purchasing seedlings from big box stores at malls as these seedling are often brought in from further afield nationally and this may be how tomato blight has been spread to home gardens.
Plants that can be planted directly in the garden as seeds: carrots, corn, cucumber, kale, lettuce, onion sets, peas, potatoes (seed potatoes) spinach, string beans, zucchini
Plants we recommend that you buy as seedlings: basil, tomatoes, sweet and hot peppers,
Weeding
Despite mulch, there will be lots of weeds that will pop up in your garden. Make sure you can see your new seedlings coming up before you start pulling weeds so you don’t accidentally pull up seedlings. Once you can identify the weeds, pull them daily. In just a few minutes you can go through your garden and catch the new weeds trying to gain access to all your lovely soil. Yank them up! If they are young weeds that have not produced seeds, you can throw them indoor compost pile.
When you research information you must cite the reference. Citing for websites is different from citing from books, magazines and periodicals. The style of citing shown here is from the MLA Style Citations (Modern Language Association).
When citing a WEBSITE the general format is as follows.
Author Last Name, First Name(s). "Title: Subtitle of Part of Web Page, if appropriate." Title: Subtitle: Section of Page if appropriate. Sponsoring/Publishing Agency, If Given. Additional significant descriptive information. Date of Electronic Publication or other Date, such as Last Updated. Day Month Year of access < URL >.
Amsel, Sheri. "A Garden Plan" Exploring Nature Educational Resource ©2005-2024. December 14, 2024
< http://exploringnature.org/db/view/A-Garden-Plan >